
Grblv1.1 Configuration
Source Websit:https://github.com/gnea/grbl/wiki/Grbl-v1.1-Configuration
Getting Started
開始設置
First, connect to Grbl using the serial terminal of your choice.
首先,首先使用串口終端設備連接Grbl
Set the baud rate to 115200 as 8-N-1 (8-bits, noparity, and 1-stop bit.)
設置波特率115200,8個數據位-沒有校驗位-一個停止位
Once connected you should get the Grbl-prompt, which looks likethis:
當你連接上的時候Grbl會給你提示,就像這樣
Grbl 1.1f ['$' for help]
Type $ and press enter to have Grbl print a help message. You shouldnot see any local echo of the $ and enter. Grbl should respond with:
輸入$並按下回車,Grbl會打印幫助信息,你不會看見本地輸入的$,Grbl會有如下的回複
[HLP:$$ $# $G $I $N $x=val $Nx=line $J=line $SLP $C $X $H ~ ! ?ctrl-x]
The ‘$’-commands are Grbl system commands used to tweak thesettings, view or change Grbl's states and running modes, and start a homingcycle. The last four non-'$' commands are realtimecontrol commands that can be sent at anytime, no matter what Grbl is doing.These either immediately change Grbl's running behavior or immediately print areport of the important realtime data like current position (aka DRO).
$命令是Grbl的係統命令用來調整設置,查看或者改變Grbl的狀態和運行模式,並且可以開始遠點回歸運動,最後四個不是$命令是實時控製命令,可以隨時發送給Grbl,無論Grbl是在做什麼,這些命令可以立即改變Grbl的運行限製或立即打印報告的重要的實時數據,如當前位置(又名DRO)。
Grbl Settings
Grbl設定
$$ - View Grbl settings
$$-查看Grbl的設置
To view the settings, type $$ and press enter after connecting to Grbl.Grbl should respond with a list of the current system settings, as shown in theexample below. All of these settings are persistent and kept in EEPROM, so ifyou power down, these will be loaded back up the next time you power up yourArduino
連接Grbl鍵入$$並按下回車,可以查看設置,Grbl會回複單簽係統設置的列表,如下麵的例子所示,這些設置都是保存在EEPROM中並且持續生效的,所以即便你關機了,下次開始他們依然會保持這些設置
The x of $x=val indicates a particular setting, while val is thesetting value. In prior versions of Grbl, each setting had a description nextto it in () parentheses, but Grbl v1.1+ no longer includes them unfortunately.This was done to free up precious flash memory to add the new featuresavailable in v1.1. However, most good GUIs will help out by attachingdescriptions for you, so you know what you are looking at.
$x=valx表示指定的設定,val是設定的數值,在之前的Grbl版本中,每個設定的都在後麵的()中有描述,不幸的時在Grblv1.1+版本中不包括這些東西,這是為了解放一些空間用於添加新的擁有的功能點,不過,許多好的GUI會附上一些描述來幫助你使用,所以你知道你在看什麼
|
Settings and sample values |
Description |
|
$0=10 |
|
|
$1=25 |
|
|
$2=0 |
|
|
$3=0 |
|
|
$4=0 |
|
|
$5=0 |
|
|
$6=0 |
|
|
$10=1 |
|
|
$11=0.010 |
|
|
$12=0.002 |
|
|
$13=0 |
|
|
$20=0 |
|
|
$21=0 |
|
|
$22=1 |
|
|
$23=0 |
|
|
$24=25.000 |
|
|
$25=500.000 |
|
|
$26=250 |
|
|
$27=1.000 |
|
|
$30=1000. |
|
|
$31=0. |
|
|
$32=0 |
|
|
$100=250.000 |
|
|
$101=250.000 |
|
|
$102=250.000 |
|
|
$110=500.000 |
|
|
$111=500.000 |
|
|
$112=500.000 |
|
|
$120=10.000 |
|
|
$121=10.000 |
|
|
$122=10.000 |
|
|
$130=200.000 |
|
|
$131=200.000 |
|
|
$132=200.000 |
$x=val - Save Grbl setting
$x=val – 保存設置
The $x=val command saves or alters a Grbl setting, which can be donemanually by sending this command when connected to Grbl through a serialterminal program, but most Grbl GUIs will do this for you as a user-friendlyfeature.
$x=val命令可以保存或改變Grbl的設置,隻要通過串口終端程序連接了Grbl,你可以每一個指令,但是大多數的Grbl GUI會給提提供一個友好的功能
To manually change e.g. the microseconds step pulse option to 10usyou would type this, followed by an enter:
手動更改例子:更改每微妙步進脈衝為10us,你可以輸入下麵的內容
$0=10
$0=10
If everything went well, Grbl will respond with an 'ok' and thissetting is stored in EEPROM and will be retained forever or until you changethem. You can check if Grbl has received and stored your setting correctly bytyping $$ to view the system settings again.
如果一切順率,Grbl會回複你‘ok’並且吧這個設置保存到EEPROM中去,然後一直保存下去,直到你要更改它,如果Grbl回複並保存了你的設置,你可以輸入$$來檢查是否正確
Grbl's $x=val settings and what they mean
Grbl $x=val 設置和他們的代表的意義
NOTE: From Grbl v0.9 to Grbl v1.1, only $10 status reports changedand new $30/ $31 spindle rpm max/min and $32 laser mode settings were added.Everything else is the same.
筆記:從Grblv0.9到Grblv1.1,隻有$10狀態報告的結果改變已經新增了$30/$31主軸最大和最小轉速,以及$32激光模式,其他部分都是一樣的
$0 – Step pulse, microseconds
$0-步進脈衝,單位:微秒
Stepper drivers are rated for a certain minimum step pulse length.Check the data sheet or just try some numbers. You want the shortest pulses thestepper drivers can reliably recognize. If the pulses are too long, you mightrun into trouble when running the system at very high feed and pulse rates,because the step pulses can begin to overlap each other. We recommend somethingaround 10 microseconds, which is the default value.
步進電機驅動器決定了最小脈衝長度,檢查數據或者試試一些數字,你可以得到步進電機的最小脈衝。如果這個脈衝太長,在非常高的脈衝頻率輸入下你可能會遇到一些麻煩,因為脈衝之間可能會相互重疊,我們推薦大概在10微妙左右,這是一個默認值
$1 - Step idle delay, milliseconds
$1 – 步進空閑延時,毫秒
Every time your steppers complete a motion and come to a stop, Grblwill delay disabling the steppers by this value. OR, you can always keepyour axes enabled (powered so as to hold position) by setting this value to themaximum 255 milliseconds. Again, just to repeat, you can keep all axes alwaysenabled by setting $1=255.
每當你的完成了一次從運動到停止的步進,Grbl都會延時一段這個數值的時間使步進脈衝無效,或者,通過設置這個值為最大的255毫秒,你可以始終保持你的軸啟用(動力保持位置)。再次重複一下,您可以通過設置$1=255來保持所有軸始終啟用。
The stepper idle lock time is the time length Grbl will keep thesteppers locked before disabling. Depending on the system, you can set this tozero and disable it. On others, you may need 25-50 milliseconds to make sureyour axes come to a complete stop before disabling. This is to help account formachine motors that do not like to be left on for long periods of time withoutdoing something. Also, keep in mind that some stepper drivers don't rememberwhich micro step they stopped on, so when you re-enable, you may witness some'lost' steps due to this. In this case, just keep your steppers enabled via$1=255
步進空閑鎖定時間是一個時間長度,Grbl會在這個時間內都保持步進鎖定,係統啟動的時候,你可以設置為0去關閉它,如果不是這樣,你可能需要25-50毫秒來確保你的軸完成運動之間是禁用的,這項功能是幫助那些不喜歡長時間不工作的步進電機(就是一直啟動的那種),另外,請記住有些步進電機驅動器會忘了自己停在哪一步,所以當你重新使能的時候你會發現一些丟失的步驟(不太清除,可能是丟步的意思),原因就是如此,遇到這種情況,隻需要設置$1=255保持步進使能即可。
$2 – Step port invert, mask
$2- 步進脈衝顛倒接口,mask值(掩碼)
This setting inverts the step pulse signal. By default, a stepsignal starts at normal-low and goes high upon a step pulse event. After a steppulse time set by $0, the pin resets to low, until the next step pulse event.When inverted, the step pulse behavior switches from normal-high, to low duringthe pulse, and back to high. Most users will not need to use this setting, butthis can be useful for certain CNC-stepper drivers that have peculiarrequirements. For example, an artificial delay between the direction pin andstep pulse can be created by inverting the step pin.
這個設置是用來翻轉步進脈衝信號的,默認的情況,正常狀態的步進脈衝信號在開始時是低電平的,並且在有脈衝輸出的時候變高,在一個脈衝的時間(由$0設置)過後變為低電平,當翻轉的時候,步進脈衝的動作開關變為正常狀態下是高電平,有脈衝時是低電平,脈衝之後再變為高電平,許多使用者可能不需要使用這個功能,但是這個對於某些特殊的步進電機驅動器是有用的,比如,在方向引腳電平跳變和脈衝輸出之間的人工延時可以通過翻轉步進脈衝方向來實現(簡單的說就是正常時的脈衝電平信號與方向的電平信號同向,這個會影響電機的啟動)
This invert mask setting is a value which stores the axes to invertas bit flags. You really don't need to completely understand how it works. Yousimply need to enter the settings value for the axes you want to invert. Forexample, if you want to invert the X and Z axes, you'd send $2=5 to Grbl andthe setting should now read $2=5 (step port invert mask:00000101).
這個翻轉掩碼是一個值,它的每一位儲存著要翻轉的軸,你不需要完全理解這個是怎麼工作的,你需要的很簡單,根據你要翻轉的軸確認要設定的值,如果你要翻轉X和Z軸,發送$2=5設定Grbl,並且確定$2=5(步進脈衝翻轉掩碼:00000101)
|
Setting Value |
Mask |
Invert X |
Invert Y |
Invert Z |
|
0 |
00000000 |
N |
N |
N |
|
1 |
00000001 |
Y |
N |
N |
|
2 |
00000010 |
N |
Y |
N |
|
3 |
00000011 |
Y |
Y |
N |
|
4 |
00000100 |
N |
N |
Y |
|
5 |
00000101 |
Y |
N |
Y |
|
6 |
00000110 |
N |
Y |
Y |
|
7 |
00000111 |
Y |
Y |
Y |
$3 – Direction portinvert, mask
$3 – 方向顛倒接口,mask值
This setting inverts the direction signal for each axis. By default,Grbl assumes that the axes move in a positive direction when the direction pinsignal is low, and a negative direction when the pin is high. Often, axes don'tmove this way with some machines. This setting will invert the direction pinsignal for those axes that move the opposite way.
這個設置是用來翻轉每個軸的方向信號的,默認來說,Grbl假定軸朝著正方向的時候電平為低,朝著反方向的時候電平為高。通常,有些軸在機器上不是這樣移動的,這個設置是為了翻轉返方向引腳的信號使得引腳朝著正確的方向。
This invert mask setting works exactly like the step port invertmask and stores which axes to invert as bit flags. To configure this setting,you simply need to send the value for the axes you want to invert. Use thetable above. For example, if want to invert the Y axis direction only, you'dsend $3=2 to Grbl and the setting should now read $3=2 (dir port invertmask:00000010)
這個翻轉掩碼的設定工作方式和步進翻轉掩碼剛好是一樣的,每一位代表著要翻轉的軸,配這個設置,你僅僅隻需要發送要翻轉的軸對應的數值即可,參考上麵的表格,如果隻想要翻轉Y軸的方向,發送$2=3設定Grbl,並且確定$2=3即可(方向接口翻轉掩碼:00000010)
$4 - Step enable invert,boolean
$4 – 步進使能翻轉 boolean值(使能)
By default, the stepper enable pin is high to disable and low toenable. If your setup needs the opposite, just invert the stepper enable pin bytyping $4=1. Disable with $4=0. (May need a power cycle to load the change.)
默認來說,步進使能引腳是高電平禁止,低電平使能,如果你需要的設置是相反的,輸入$4=1就可以翻轉為高電平使能,$4=0則是禁止(可能需要重啟的來更新配置)
$5 - Limit pins invert,boolean
$5 – 限位引腳翻轉,boolean值
By default, the limit pins are held normally-high with the Arduino'sinternal pull-up resistor. When a limit pin is low, Grbl interprets this astriggered. For the opposite behavior, just invert the limit pins by typing$5=1. Disable with $5=0. You may need a power cycle to load the change.
默認來說,arduino內置了上拉電阻,限位引腳一般是保持高電平的,當引腳電平是低的時候,Grbl會認為已經觸發了,如果是相反的動作,則隻需要輸入$5=1翻轉限位引腳即可,如果不需要翻轉則輸入$5=0,你可能需要重啟來更新配置
NOTE: For more advanced usage, the internal pull-up resistor on thelimit pins may be disabled in config.h.
注意:對於更高級的使用者,你可以在config.h文件裏麵禁用內置上拉電阻
$6 - Probe pin invert, boolean
$6 – 探測引腳翻轉,boolean值
By default, the probe pin is held normally-high with the Arduino'sinternal pull-up resistor. When the probe pin is low, Grbl interprets this astriggered. For the opposite behavior, just invert the probe pin by typing $6=1.Disable with $6=0. You may need a power cycle to load the change.
默認來說,arduino內置了上拉電阻,探測引腳一般是保持高電平的,當引腳電平是低的時候,Grbl會認為已經觸發了,如果是相反的動作,則隻需要輸入$6=1翻轉限位引腳即可,如果不需要翻轉則輸入$6=0,你可能需要重啟來更新配置
$10 - Status report, mask
$10 – 狀態報告,mask值
This setting determines what Grbl real-time data it reports back tothe user when a '?' status report is sent. This data includes current runstate, real-time position, real-time feed rate, pin states, current overridevalues, buffer states, and the g-code line number currently executing (ifenabled through compile-time options).
這個設置決定了Grbl實時數據的反饋,當用戶發送了一個‘?’狀態報告就會被返回,這個數據是包括了當前的運行數據,實時的位子,實時的給進速率,引腳狀態,當前的覆蓋值,緩衝區的狀態,和目前執行的G代碼行數(如果啟用需要經過編譯)。
By default, the new report implementation in Grbl v1.1+ will includejust about everything in the standard status report. A lot of the data ishidden and will appear only if it changes. This increases efficiencydramatically over of the old report style and allows you to get faster updatesand still get more data about your machine. The interface documentationoutlines how it works and most of it applies only to GUI developers or thecurious.
默認狀態下,Grbl v1.1執行的是新的的狀態報告它包括了之前的標準狀態報告,有許多數據是隱藏的隻會顯示改變了的數據,這個提升了舊報告樣式的效率,允許你更快的獲得更新數據並且依然能獲得很多機械數據,這個接口文檔講述了它的工作原理,其中大部分隻適用於GUI開發人員或業餘人員。
To keep things simple and consistent, Grbl v1.1 has only tworeporting options. These are primarily here just for users and developers tohelp set things up.
為了讓事情更加簡單,統一。Grbl v1.1隻有兩個報告選項,這些主要是為用戶和開發人員設置的。
- Position type may be specified to show either machine position (MPos:) or work position (WPos:), but no longer both at the same time. Enabling work position is useful in certain scenarios when Grbl is being directly interacted with through a serial terminal, but machine position reporting should be used by default.
- 位置選項可以是選擇是機器位子(Mpos)或工作位置(Wpos),但是兩者不會同時顯示,工作位置有些時候是有用的比如Grbl通過串口終端連接的時候,但是默認報告使用的是機器位置
- Usage data of Grbl's planner and serial RX buffers may be enabled. This shows the number of blocks or bytes available in the respective buffers. This is generally used to helps determine how Grbl is performing when testing out a streaming interface. This should be disabled by default.
- 啟用串口接受緩衝區可以知道Grbl的數據利用情況,這個會顯示了接受緩衝區可用的塊和字節,測試數據數據流接口通常可以幫助我們判斷Gerl是如何去執行的
Use the table below enables and disable reporting options. Simplyadd the values listed of what you'd like to enable, then save it by sendingGrbl your setting value. For example, the default report with machine positionand no buffer data reports setting is $10=1. If work position and buffer dataare desired, the setting will be $10=2.
使用下麵的報告選項使能和禁用表,添加你想要啟用的功能對應的數值,發送給Grbl並保存它即可,舉個例子,默認值是$10=1報告隻有機器位置並且沒有接受緩衝區的報告,如果你希望有工作位置和緩衝區數據,那麼需要設置$10=2
|
Report Type |
Value |
Description |
|
Position Type |
0 |
Enable WPos: Disable MPos:. |
|
Position Type |
1 |
Enable MPos:. Disable WPos:. |
|
Buffer Data |
2 |
Enabled Buf: field appears with planner and serial RX available buffer. |
$23 - Homing dir invert, mask
$23 – 複位方向翻轉,mask值
By default, Grbl assumes your homing limit switches are in thepositive direction, first moving the z-axis positive, then the x-y axespositive before trying to precisely locate machine zero by going back and forthslowly around the switch. If your machine has a limit switch in the negativedirection, the homing direction mask can invert the axes' direction. It worksjust like the step port invert and direction port invert masks, where all youhave to do is send the value in the table to indicate what axes you want toinvert and search for in the opposite direction.
默認來說,Grbl假定你的複位限位開關是在正方向上的,首先z軸會向正方向移動,然後x-y軸向正方向移動,然後在快關周圍來回的移動精確的查找機器零點,如果你的開關在負方向,在複位方向掩碼中可以翻轉軸的方向,它的工作模式個步進接口翻轉和方向接口翻轉一樣,您隻需在發送在表中值,以指示您要反轉哪些軸,並朝相反的方向搜索即可。
$24 - Homing feed, mm/min
$24 - 複位尋找速度,mm/min
The homing cycle first searches for the limit switches at a higherseek rate, and after it finds them, it moves at a slower feed rate to home intothe precise location of machine zero. Homing feed rate is that slower feedrate. Set this to whatever rate value that provides repeatable and precisemachine zero locating
原點複位首先會以很高的給進速率去尋找限位開關,在找到之後,再以很慢的給進速率去移動到機器零點的位置,複位查找速率就是這個很慢的速率,這個可以重複設置提供機器零點的速率
$25 - Homing seek, mm/min
$25 - 複位給進速度, mm/min
Homing seek rate is the homing cycle search rate, or the rate atwhich it first tries to find the limit switches. Adjust to whatever rate getsto the limit switches in a short enough time without crashing into your limitswitches if they come in too fast
.複位給進速度是原點複位的查詢速度,或者說這是一開始尋找限位開關的速率,如果它太快了,你可以調試這個速度,把到限位開關的時間控製的足夠短,而不會讓機器撞到的限位開關
$26 - Homing debounce, milliseconds
$26 – 複位消抖,毫秒
Whenever a switch triggers, some of them can haveelectrical/mechanical noise that actually 'bounce' the signal high and low fora few milliseconds before settling in. To solve this, you need to debounce thesignal, either by hardware with some kind of signal conditioner or by softwarewith a short delay to let the signal finish bouncing. Grbl performs a shortdelay, only homing when locating machine zero. Set this delay value to whateveryour switch needs to get repeatable homing. In most cases, 5-25 milliseconds isfine.
無論什麼時候開關被觸發,它們都會產生一些電氣/機械的噪音,其實信號從高到低的跳變過程長達幾個毫秒,為了解決這個問題你需要消除信號的抖動,在硬件上使用一些信號的調節器或者軟件上在信號跳變時使用少量的延時,Grvl可以完成這個極短的延時,不過隻在複查查找機器零點的時候,設置這個延時數值無論你的開關重複複位幾次都是適用的,在大多數情況下,5-25毫秒是最好的
$27 - Homing pull-off, mm
$27 – 複位返回行程, mm
To play nice with the hard limits feature, where homing can sharethe same limit switches, the homing cycle will move off all of the limitswitches by this pull-off travel after it completes. In other words, it helpsto prevent accidental triggering of the hard limit after a homing cycle. Makesure this value is large enough to clear the limit switch. If not, Grbl willthrow an alarm error for failing to clear it.
為了發揮硬限製功能,複位可以使用相同位子的限位開關,複位完成後將會移動到限位開關外麵。換句話說,它有助於防止複位後再意外的觸發硬限製。確保此值足夠大以清限位開關的信號。如果不夠大,Grbl會因未能清除開關信號而發出警報錯誤。
$30 - Max spindle speed, RPM
$30 – 最大主軸轉速,rmp
This sets the spindle speed for the maximum 5V PWM pin output. Forexample, if you want to set 10000rpm at 5V, program $30=10000. For 255rpm at5V, program $30=255. If a program tries to set a higher spindle RPM greaterthan the $30 max spindle speed, Grbl will just output the max 5V, since itcan't go any faster. By default, Grbl linearly relates the max-min RPMs to5V-0.02V PWM pin output in 255 equally spaced increments. When the PWM pinreads 0V, this indicates spindle disabled. Note that there are additionalconfiguration options are available in config.h to tweak how this operates.
這個設置中PWM引腳輸出最大主軸轉速時是5V,舉個例子,如果你想要去設定10000轉,寫$30=10000,如果是255轉,寫入$30=255,如果程序設置的值了超過了$30最大主軸轉速,Grbl將會隻輸出5v的最大電壓,因為它不能在快了,默認來說,Grbl用PWM引腳輸出255個等間隔增量來輸出線性的5V-0.02V的最大最小轉速。當PWM引腳讀取到0V時,表示主軸是禁用的,注意:在config.h中還有其他配置選項可用來調整它的工作方式。
$31 - Min spindle speed, RPM
$31 – 最小主軸轉速,rmp
This sets the spindle speed for the minimum 0.02V PWM pin output (0Vis disabled). Lower RPM values are accepted by Grbl but the PWM output will notgo below 0.02V, except when RPM is zero. If zero, the spindle is disabled andPWM output is 0V.
這個設置中PWM引腳輸出最小轉速時是0.2V(0V是禁用),Grbl能接受很低的轉速但PWM輸出不會低於0.2V,除非轉速是0V,如果是0V,這個主軸是禁用的並且PWM輸出也是為0V
$32 - Laser mode, Boolean
$32 – 激光模式,boolean值
When enabled, Grbl will move continuously through consecutive G1,G2, or G3 motion commands when programmed with a S spindle speed (laser power).The spindle PWM pin will be updated instantaneously through each motion withoutstopping. Please read the GRBL laserdocumentation and your laser device documentation prior to using this mode.Lasers are very dangerous. They can instantly damage your vision permanantlyand cause fires. Grbl does not assume any responsibility for any issues thefirmware may cause, as defined by its GPL license.
如果啟動,程序使用S主軸轉速(激光模式)Grbl會持續不斷的使用G1、G2,G3這些移動命令移動,主軸PWM引腳每一個運動的瞬間都會更新不會停止,在使用這個模式之前請先閱讀GRBL激光模式文檔和激光模式驅動文檔,激光是十分危險的。它們會瞬間損害你的視力並引發火災。Grbl對其硬件可能導致的任何問題不承擔任何責任,GPL許可證中有定義。
When disabled, Grbl will operate as it always has, stopping motionwith every S spindle speed command. This is the default operation of a millingmachine to allow a pause to let the spindle change speeds.
如果禁止,Grbl將會和之前一樣工作,在每個主軸運動命令後停止運動,這是默認的銑床模式,可以暫停來來讓主軸改變速度。
$100, $101 and $102 – [X,Y,Z] steps/mm
$100, $101 and $102 – [X,Y,Z]步/mm
Grbl needs to know how far each step will take the tool in reality.To calculate steps/mm for an axis of your machine you need to know:
Grbl需要知道實際中使用的工具每一步走了多遠,為了計算每一軸的 步/mm 你需要知道
- The mm traveled per revolution of your stepper motor. This is dependent on your belt drive gears or lead screw pitch.
- 你的步進電機每一圈轉了多少毫米,這決定於你的皮帶傳統齒輪和絲杆螺距
- The full steps per revolution of your steppers (typically 200)
- 每轉一圈全部的步數(通常為200)
- The microsteps per step of your controller (typically 1, 2, 4, 8, or 16). Tip: Using high microstep values (e.g., 16) can reduce your stepper motor torque, so use the lowest that gives you the desired axis resolution and comfortable running properties
- 控製器每步的微步(通常為1,2,4,8或16)。提示:使用高微步數值(例如16)可以降低步進電機的轉矩,因此請使用最低值,以獲得所需的軸分辨率和舒適的運行屬性
The steps/mm can then be calculated like this: steps_per_mm =(steps_per_revolution*microsteps)/mm_per_rev
這個 步/mm 可以這樣計算:步每毫米 =(步每圈*微步)/毫米每圈
Compute this value for every axis and write these settings to Grbl.
為每個軸計算這個值並寫入到Grbl的設置中
$110, $111 and $112 – [X,Y,Z] Max rate, mm/min
$110, $111 and $112 – [X,Y,Z] 最大速率,mm/分鍾
This sets the maximum rate each axis can move. Whenever Grbl plans amove, it checks whether or not the move causes any one of these individual axesto exceed their max rate. If so, it'll slow down the motion to ensure none ofthe axes exceed their max rate limits. This means that each axis has its ownindependent speed, which is extremely useful for limiting the typically slowerZ-axis.
這個設置了每一軸移動的最大速率,每當Grbl按計劃移動是,它會檢查移動是否導致這些單個軸中的任何一個超過其最大速率。如果是這樣,它會減慢運動速度,以確保沒有任何軸超出其最大速率限製。這意味著每個軸都有自己的獨立速度,這對於限製通常較慢的Z軸非常有用。
The simplest way to determine these values is to test each axis oneat a time by slowly increasing max rate settings and moving it. For example, totest the X-axis, send Grbl something like G0 X50with enough traveldistance so that the axis accelerates to its max speed. You'll know you've hitthe max rate threshold when your steppers stall. It'll make a bit of noise, butshouldn't hurt your motors. Enter a setting a 10-20% below this value, so youcan account for wear, friction, and the mass of your workpiece/tool. Then,repeat for your other axes.
確定這些值的最簡單方法是逐個測試每個軸,方法是緩慢增加最大速率設置並移動它。例如,要測試X軸,請發送Grbl的指令比如 G0X50並且有足夠的行進距離,以便軸加速到其最大速度。當你的步進電機失速時,你就知道你達到了最高速率閾值。它會產生一些噪音,但不應該傷害你的電機。輸入一個比該值低10-20%的設置,這樣就可以緩解磨損,摩擦以及工件/工具的質量。然後,重複您的其他軸。
NOTE: This max rate setting also sets the G0 seek rates.
注意:這個最大速度設置也是G0給進速率的設置
$120, $121, $122 – [X,Y,Z] Acceleration, mm/sec^2
$120, $121, $122 – [X,Y,Z] 加速度,mm/s^2
This sets the axes acceleration parameters in mm/second/second.Simplistically, a lower value makes Grbl ease slower into motion, while ahigher value yields tighter moves and reaches the desired feed rates muchquicker. Much like the max rate setting, each axis has its own accelerationvalue and are independent of each other. This means that a multi-axis motionwill only accelerate as quickly as the lowest contributing axis can.
這設置是mm/秒/秒為單位設置軸加速度。簡單地說,較低的值使得Grbl緩慢地運動,而較高的值產生更緊密的運動並更快地達到期望的進給速率。與最大速率設置非常相似,每個軸都有其自己的加速度值,並且彼此獨立。這意味著多軸運動將隻有像最少作用的軸一樣是快速加速的。(我也不知道最後一句講了什麼…….)
Again, like the max rate setting, the simplest way to determine thevalues for this setting is to individually test each axis with slowlyincreasing values until the motor stalls. Then finalize your accelerationsetting with a value 10-20% below this absolute max value. This should accountfor wear, friction, and mass inertia. We highly recommend that you dry testsome G-code programs with your new settings before committing to them.Sometimes the loading on your machine is different when moving in all axestogether.,
同樣的,像最大速率設置,確定此設置值的最簡單方法是逐漸測試每個軸的緩慢增加值,直到電機停轉。然後以比此絕對最大值低10-20%的值完成加速度設置。這應該考慮到磨損,摩擦和質量慣性。我們強烈建議您在提交之前使用新設置對某些G代碼程序進行幹式測試。有時候,所有軸一起移動時,機器上的加載會有所不同。
$130, $131, $132 – [X,Y,Z] Max travel, mm
$130, $131, $132 – [X,Y,Z] 最大行程,mm
This sets the maximum travel from end to end for each axis in mm.This is only useful if you have soft limits (and homing) enabled, as this isonly used by Grbl's soft limit feature to check if you have exceeded yourmachine limits with a motion command.
這個設置是以mm設置每個軸的最大行程,如果你開啟了軟限製那麼這個是有用的,因為這個隻適用於你的軟限製功能,來檢查的移動命令是否超過機器限製
Quick Guide to Setting Up Your Machine for the First Time
第一次使用時使用快速設置向導設置你的機器
Grbl's default configuration is intentionally very generic to helpensure users can see successful motion without having to tweak settings.Generally, the first thing you'll want to do is get your stepper motorsrunning, usually without it connected to the CNC. Wire Grbl to your stepperdrivers and stepper motors according to your manufacturer guidelines. Connectto Grbl through a serial terminal or one of many Grbl GUIs. Send some G1 or G0 commandsto Grbl. You should see your stepper motor rotating. If you are having troublewith your stepper motors, try the following:
Grbl的默認配置是非常通用的,可以確保用戶看到成功的運動而無需調整設置。一般來說你的第一件事是讓你的電機動起來,而不是連接到CNC中,將Grbl和你的步進電機驅動器相連接而且需要根據廠房的指導連接,通過串口終端和一些GUI與Grbl對接,發送G0或G1命令給Grbl,你可以看到步進電機轉動,如果啟動步進電機有困難,你額可以嚐試以下方法
- Ensure everything is wired and powered correctly per your stepper driver manufacturer guidelines.
- If your steppers are mounted in your CNC already, ensure your axes move freely and don't obviously bind. If you can't easily tell, try removing your steppers and check if they run under no load.
- Ensure your stepper motors and axes linear mechanisms are all tight and secure. Small set screws on drivetrain components becoming loose is a very common problem. Re-tighten and try applying some non-permenant thread locker (Loctite blue) if it continually loosens.
- For more difficult issues, try the process of elimination to quickly isolate the problem. Start by disconnecting everything from the Arduino. Test if Grbl is operating ok by itself. Then, add one thing at a time and test.
- If your steppers are powered and making a grinding noise when trying to move, try lowering the '$' acceleration and max rate settings. This sound is a sign that your steppers is losing steps and not able to keep up due too much torque load or going too fast.
- Grbl's default step pulse settings cover the vast majority of stepper drivers on the market. While very uncommon, check these settings if you are still experiencing problems or have a unusual setup.
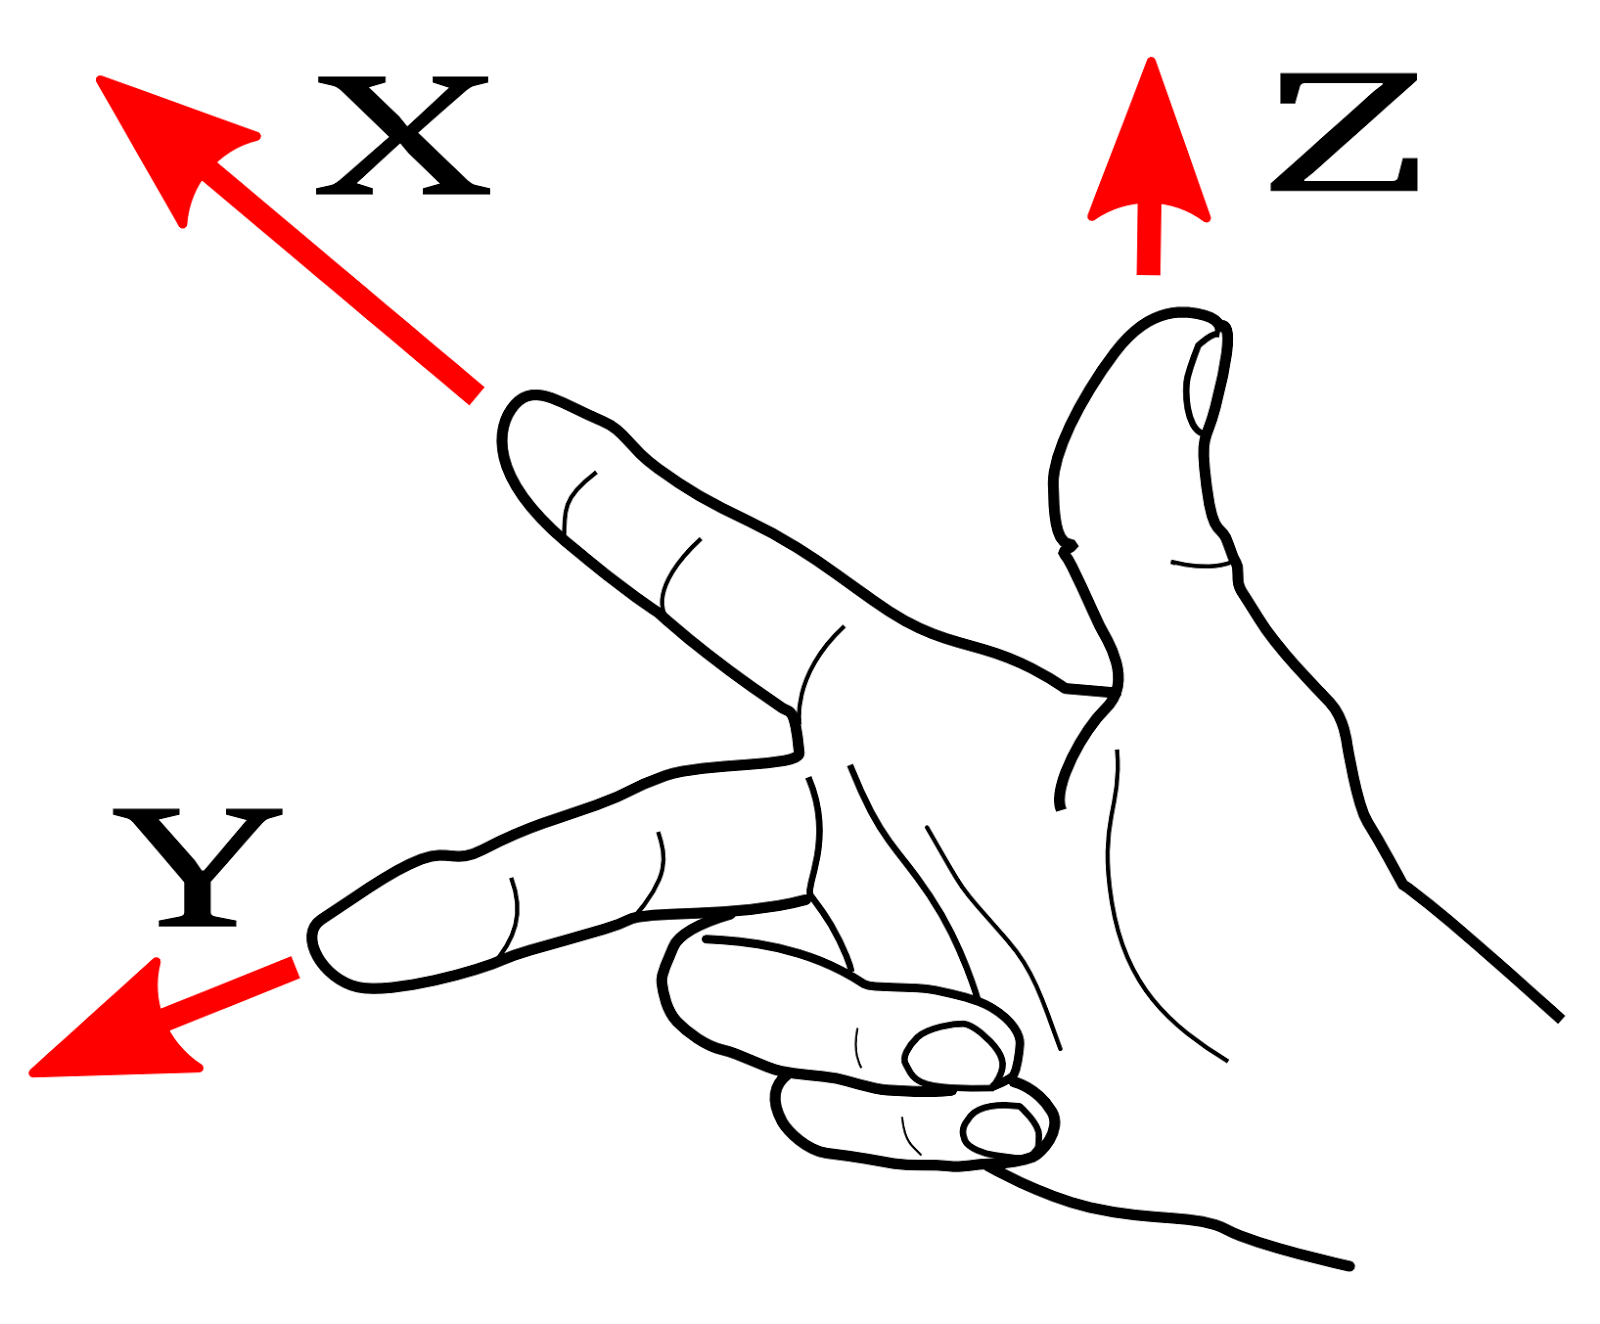
Next, you will need to make sure your machine is moving in thecorrect directions according to a Cartesian(XYZ) coordinate frame and satisfiesthe right-hand rule, as shown:
接下你需要保證你的機器移動是根據正確Cartesian(XYZ)坐標係,符合右手定則建立的正確方向
Mount your stepper motors into your CNC, if you haven't already doneso. Send Grbl some motion commands, such as G91 G0 X1 or G91 G0 X-1, which willmove the x-axis +1mm and -1mm, respectively. Check all axes. If an axis is notmoving correctly, alter the $3 direction port mask setting to invert thedirection.
安裝你的步進電機到你的CNC係統中,如果你完成了這些工作,發送一些Grbl運動命令,例如G91 G0 X1或G91 G0 X-1,將分別移動x軸+1mm和-1mm,然後用同樣的方法檢查所有的軸,如果有一個軸沒有正確的移動,更改$3方向設定可以改變設定方向
If you are unfamiliar with how coordinate frames are setup on CNCmachines, see this great diagram by LinuxCNC.Just keep in mind that motions are relative to the tool. So on atypical CNC gantry router, the tool will move rather than the fixed table. Ifthe x-axis is aligned positive to the right, a positive motion command willmove the tool to the right. Whereas, a moving table with a fixed tool will movethe table to the left for the same command, because the tool is moving to theright relative to the table.
如果你不熟悉如何給的CNC機器設置坐標係,你可以看看這篇LinuxCNC圖標,
本文版权:http://www.ndfweb.cn/news-720.html